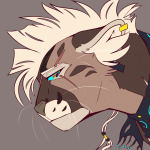
Okay, got's another picture up!
Thinking I am getting close on the lens flares. And did something I have not ever successfully done. Made a friggin big picture! 8x22 or 22x8 inch size. Unfortunately, there is a fold and the the paper edge still present in the image, can't rid that sadly.
Was drawn to challenge myself, really trying to see what I can do. Also still learning lens flares through traditional art. And then in my MIX list of songs, came to Syphon Filter: Logan's Shadows "Our Only Option" song. Fit so well. Decided to name this after it, and ironically that was kind of the situation in the picture.
https://www.youtube.com/watch?v=LX6EanFR4yU
I hope you guys like it!
Please, rate, favourite, comment, share, like, subscribe!
ALL Artwork; Rien [c] 1Ts38n 2016
[mlkfaa] - 1Timestones38n's Album -> 02-03-2016_WM_Our Only
Technically you're not supposed to find this forum, but you found it. Please don't use this forum to post things, use the MLKFAA only.
12 posts
• Page 1 of 2 • 1, 2
[mlkfaa] - 1Timestones38n's Album -> 02-03-2016_WM_Our Only
![]() by FeatheredSeclude » February 3rd, 2016, 9:48 am
by FeatheredSeclude » February 3rd, 2016, 9:48 am
-
FeatheredSeclude

- Posts: 49
- Joined: November 20th, 2010, 9:57 pm
- Nickname(s): Feathered
- Gender: Non-binary
- Pride Points: 5
Re: [mlkfaa] - 1Timestones38n's Album -> 02-03-2016_WM_Our O
![]() by Tako » February 3rd, 2016, 8:51 pm
by Tako » February 3rd, 2016, 8:51 pm
You're on fire boiiiii, I've never seen you post so much :0
Awesome details to this! Love the the lens flare effect from the moon and Rien's amulet! C: Teach me ;A;
Awesome details to this! Love the the lens flare effect from the moon and Rien's amulet! C: Teach me ;A;
-
Tako

uh
- Posts: 174
- Joined: November 5th, 2012, 10:42 pm
- Location: in my own world
- Nickname(s): Tak, Ellie
- Gender: Female
- Pride Points: 7
Re: [mlkfaa] - 1Timestones38n's Album -> 02-03-2016_WM_Our O
![]() by FeatheredSeclude » February 3rd, 2016, 10:42 pm
by FeatheredSeclude » February 3rd, 2016, 10:42 pm
Indeed!
And on top of that, been modding KH2FM a lot more.
Check dis out:
rev94
https://www.youtube.com/watch?v=yPOihBHZ-HU
Original
https://www.youtube.com/watch?v=q81f-ecOsrs
They are nothing alike.
Will try. (watch videos showcasing lens flares, they'll help you get a hold of how they behave)
Make the flare, before you colour the picture.
(then colour your image, and as touch-ups to the flare as needed)
I start out with a pencil line-art. (0.5mm/0.7mm mechanical)
I'll take a gel pen and line the parts in the pen where the least light will hit.
Then I'll go to the brightest areas of my line art., erase them light enough to where you can hardly see them. Then go over them with yellow, and maybe a little orange at the points they overlap the pencil line-art.
Use the yellow and add a bit of bloom effect by lightly stroking over and around the yellow line-art.
Now the lens flare.
Make a really lite circle around where you want the core of your flare to be.
Then take literally follow the colour-chart set up with colours as you rainbow just inside the circle, keeping the lines facing/pointing to the focal point.
After that. Use orange, or light red and follow the flares focal point, but don't go over any of the yellow line-arts.
And after that, take orange, and light bloom around the rainbowed flare you made.
For the continued flare from lens to lens.
You how in line from the flare on Rien's necklace, there are three other mini flares going across the image.
One small, another medium, and a bigish one.
The middle one will tend to be the middle of your lens. It should be 1/3 the size, the shape can vary, I used a square. Did the same steps as the normal flare. Then followed that with the smaller and 3rd one.
The 3rd should reverse mirror(or close) the original flare, due to how it refracts on a lens.
Do the process on the first flare on it as well, with what shape you want.
Then if you are fancing, there could be a 4th mini flare, typically diamond or triangle shape on the line of the original flare, but it will be the other way from the original flare, as you can see behind Rien's leg.
Either use the three primary or the three secondary colours for it, and follow the other process the same.
Now use your eraser/ruler. Use the eraser and just inside/outside flare, erase a thin line, to get the effect you see there. You will do this step before you colour the rest of the image and after. Try to skip over colouring ontop of the flares you have made.
After you have finished colouring your image. Use the ruler, make a small erase line in line with the flares you have made. Then if you want to, put the ruler horizontal on the min flare, and maybe on the big mini flare, and make an erase line over it, but vary your pressure some.
I want to try and make a video about this. Since it is a lot to explain, and would be easy to get seeing it done as it is explained.
Also I would shade throughout the whole picture, before colouring anything, after colouring, in middle of layers. Helps out a to bring out the flare.
I hope this helps out. Since I am still learning and experimenting with it myself. But this one seems nice as is.
-
FeatheredSeclude
- Posts: 49
- Joined: November 20th, 2010, 9:57 pm
- Nickname(s): Feathered
- Gender: Non-binary
- Pride Points: 5
Re: [mlkfaa] - 1Timestones38n's Album -> 02-03-2016_WM_Our O
![]() by FeatheredSeclude » February 3rd, 2016, 10:43 pm
by FeatheredSeclude » February 3rd, 2016, 10:43 pm
#FAIL
I posted a new comment rather than replying.
Check the comment, lol
I posted a new comment rather than replying.
Check the comment, lol
-
FeatheredSeclude
- Posts: 49
- Joined: November 20th, 2010, 9:57 pm
- Nickname(s): Feathered
- Gender: Non-binary
- Pride Points: 5
Re: [mlkfaa] - 1Timestones38n's Album -> 02-03-2016_WM_Our O
![]() by Leviara_Lioness » February 5th, 2016, 7:05 am
by Leviara_Lioness » February 5th, 2016, 7:05 am
OMG I love this Bro Times! Very nice! Awesome art! 


-
Leviara_Lioness
Israeli Princess Lioness

Israeli Princess Cleopah Lioness
- Posts: 2717
- Joined: November 3rd, 2015, 7:56 am
- Location: Jerusalem Yisrael!
- Nickname(s): Sarbi, Cleopah, Jasmine, Cleo, Levi or Levira
- Gender: Female
- Pride Points: 59
Re: [mlkfaa] - 1Timestones38n's Album -> 02-03-2016_WM_Our O
![]() by FeatheredSeclude » February 5th, 2016, 8:22 pm
by FeatheredSeclude » February 5th, 2016, 8:22 pm
Thanks a lot!
-
FeatheredSeclude
- Posts: 49
- Joined: November 20th, 2010, 9:57 pm
- Nickname(s): Feathered
- Gender: Non-binary
- Pride Points: 5
Re: [mlkfaa] - 1Timestones38n's Album -> 02-03-2016_WM_Our O
![]() by Leviara_Lioness » February 6th, 2016, 3:17 am
by Leviara_Lioness » February 6th, 2016, 3:17 am
Youre very welcome Times Bro! Hey wana do and Art Trade Requesrt thingy?? I've 5 spots left Open, you can if you want draw my Lioness/Leopardess Char in Saber Form??! If yah like Bro?! I'll draw you of course, in Saber form if you want?!
-
Leviara_Lioness
Israeli Princess Lioness
Israeli Princess Cleopah Lioness
- Posts: 2717
- Joined: November 3rd, 2015, 7:56 am
- Location: Jerusalem Yisrael!
- Nickname(s): Sarbi, Cleopah, Jasmine, Cleo, Levi or Levira
- Gender: Female
- Pride Points: 59
Re: [mlkfaa] - 1Timestones38n's Album -> 02-03-2016_WM_Our O
![]() by FeatheredSeclude » February 6th, 2016, 7:54 pm
by FeatheredSeclude » February 6th, 2016, 7:54 pm
Not at the time being... was barely able to squueeze in one for DumbMutt. And it is giving me issues. I see why I don't them very often.
Sorry about that. If I am fancing, I'll message you.
Sorry about that. If I am fancing, I'll message you.
-
FeatheredSeclude
- Posts: 49
- Joined: November 20th, 2010, 9:57 pm
- Nickname(s): Feathered
- Gender: Non-binary
- Pride Points: 5
Re: [mlkfaa] - 1Timestones38n's Album -> 02-03-2016_WM_Our O
![]() by Leviara_Lioness » February 7th, 2016, 3:11 am
by Leviara_Lioness » February 7th, 2016, 3:11 am
ok, no prollem Bro Times! When yur ready I'll be ready. 
-
Leviara_Lioness
Israeli Princess Lioness
Israeli Princess Cleopah Lioness
- Posts: 2717
- Joined: November 3rd, 2015, 7:56 am
- Location: Jerusalem Yisrael!
- Nickname(s): Sarbi, Cleopah, Jasmine, Cleo, Levi or Levira
- Gender: Female
- Pride Points: 59
Re: [mlkfaa] - 1Timestones38n's Album -> 02-03-2016_WM_Our O
![]() by rachel » April 8th, 2019, 7:27 pm
by rachel » April 8th, 2019, 7:27 pm
Is that a Roman coloseuium in the background?
MAGA
-
rachel
MAGA

Proud to say that Jesus is my Lord and Saivor
- Posts: 63
- Joined: September 21st, 2018, 8:17 pm
- Location: somewhere in the Fan Art Albums
- Nickname(s): Rachel, Lamb, Lamb the cat
- Telegram: Don't have telegram
- Gender: Female
- Pride Points: 1
12 posts
• Page 1 of 2 • 1, 2
Who is online
Users browsing this forum: Google [Bot] and 57 guests
- The team • Delete all board cookies • All times are UTC [ DST ]